For my second assignment, I have been given a choice between photographing the unseen or using props to create a narrative. This is my learning log.
For this project I have decided to choose the first option, the unseen. My reason, is that I feel that this is more challenging and it can help me become more familiar with the theory of semiotics and how to put it into practice in my future compositions. The Unseen is another form of pictorial narrative; but this time I am going about it in another way.
Part of my brief is to make a list of at least seven ideas for the unseen. Maybe my life is a little too ordinary and dull but seven ideas was tough and all I could manage.
MY PLANNING
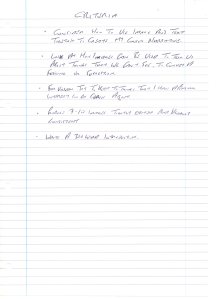
I first made a note of the assignment criteria to help guide my thoughts.
I then considered technical methods for image making that might inspire some ideas.

I then continued to put my thoughts on paper as to what I could conceder as unseen.

I then made a list of potential subjects.
From these general lists I fell upon the subject of depression and hope in the context of redundancy.
I then decided to write a narrative which I gave a working-title of ‘Redundant Reflections’ . Now I had my first draft of my narrative, I could then start thinking about what pictures I wanted / needed and how they might look like. Therefore, I broke it down in to sections in my mind, then made a list of the images that I believed would complement the text. I initially listed eight images then later decided that seven was enough.
I sketched out some ideas for images. a couple I used and for other images that I later produced simply came out my head as worked with my camera.
PUTTING IT ALL TOGETHER
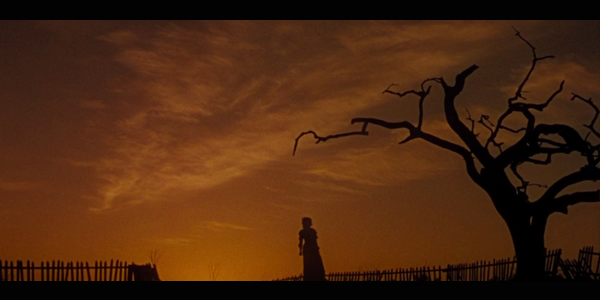
The first image that I made from my narrative represents the beginning of my recovery from my depression. I wanted something to both represent my dog how she has contributed positively to my life. The lead refers both to a dog and walks / exercise, a toy representing fun and happiness / love and a dog biscuit that suggesting reward.

D-800e, 24-120mm f/4, @50mm, 1/80, f/4.5, ISO-320, ambient light, RAW. Adjustments in Lightroom and converted to grey-scale in Photoshop.
The second image I created is for the opening image to this project, representing my redundancy. I thought of finding something that I used and is recognized as a familiar object that would be associated with work but now could also be considered redundant as a useful object. A popular object from the recent past that is both no longer in fashion and redundant in popular use was my old Filo-Fax which has now been replaced by electronic diaries. My first idea was to photograph it with other redundant objects such as a feather quill pen and bottled ink, old stamps and old redundant currency. When I put it all together, I didn’t like it. I then realized that I was looking for a strong metaphoric message for redundancy and that was simple. Simply throw the Filo-Fax in the bin! By chance the two pieces of paper that found themselves at the top of the bin couldn’t have been better placed. An eye and a sales brochure with the words “Just You” as if to say, “We just got rid of you.” In order to get a good exposure for the white paper and black Filo-Fax, I used my Sekonda hand-held lightmeter to take an incident reading.

D-800e, 24-120mm f/4, @120mm, 1/125, f/5.6, ISO-5000, ambient light, metered using hand-held incident lightmeter, RAW. Adjustments made in Lightroom, converted to grey-scale in Photoshop.
The next image I created was the second image for the first paragraph to represent my job hunting and the market conditions. The idea for this image came strait off the page of my narrative.

D-800e, 24-120mm f/4, @31mm 1/80, f/8, ISO-4000, ambient light, metered using incident measurement from hand-held lightmeter. Adjustments made in Lightroom, converted to grey-scale in Photoshop.
For the next image I worked on, my initial idea was to play on the words ‘learning curve’ and using a stack of books to make a curve; but as you may see, I don’t think that this idea worked too well; so I stopped and read the book ‘This Means This, This Means That’ by Sean Hall, to get fresh inspiration. The final composition was inspired by Alfred Hitchcock, he has used this point of view in a couple of his films. The red No Entry symbol on the front cover of the book, I thought, would look better returned to red. by colour popping.

D-800e, 24-120mm f/4 @65mm, 1/160, f/4, ISO-4000, ambient lighting. Adjusted in Lightroom and converted to greyscale in Photoshop.

D-800e, 24-120mm f/4 @58mm, 1/80, f/9, ISO-4000, ambient lighting. Adjusted in Lightroom and converted to grey-scale and colour-popped in Photoshop.

Alfred Hitchcock.
However, when I asked my student forum to comment on my work, the consistent opinion was to keep all the pictures in grey-scale except for the last image which they agreed worked in colour; so I changed this back to full grey-scale and made alterations to the text as also suggested.

Camera settings unchanged from above.
I had an idea for the ending as something to suggest a new beginning and optimism for the future. At the time of this project it was early spring with the buds just coming out and ideal for my last image. I decided that although I have chosen to use grey-scale the last image must emphasise hope and I felt that a colour image dominated by green would suggest this. Plus I feel that this change to colour also acts as a full-stop to the narrative.

D800e, 105mm f/2.8, 1/80, f/8, ISO-125, ambient light only, adjustments made in Lightroom.
I then set about trying to create an image to suggest shock, I couldn’t find any examples on the internet other than foolish images of people looking wide eyed and open mouthed. I considered a broken cup or spilt tea / coffee but I wasn’t sure that that would suggest anything other than a broken cup or a spillage. I then had the idea of filling a cup with tea and photographing it as I banged it on a table to capture the shock wave like ripples. But as you can see, I don’t think that the image is powerful enough to convey what I was after. In the end I decided that this image was not needed for the narrative anyway.

D800e, 105mm f/2.8, 1/250, f/3, ISO-800, remote shutter control with remote speedlight in a soft-box. Adjustments made in Lightroom, converted to grey-scale in Photoshop.
I decided to move on to produce an image conveying the business travel and my choice of image with the pillow can also be associated with the sack. I am particularly pleased with this image, it’s simple but I think to the point. (I hope you agree.)

D800e, 24-120mm f/4, @58mm, 1/60, f/4, ISO-800, ambient light only. Adjustments made in Lightroom, converted to grey-scale in Photoshop.
The last image I made for the set was to convey an impression of depression and poor health. This came surprisingly easily, as I recalled that Hollywood movies often uses the symbolism of a tub of ice-cream when the heroin is depressed or sad; so why not use the same idea? My first attempt was okay; but I didn’t think was strong enough in it’s message; so I reshot using a hamburger that really represented bad diet and unhealthy living. This image I believe best represents the result of my redundancy which I think is far better than trying to create something to just symbolize shock.

D800e, 24-120mm f/4, @78mm, 1/125, f/8, ISO-125, remote speedlight in a soft-box. Adjustments made in Lightroom, converted to grey-scale in Photoshop.

D800e, 24-120mm f/4 @86mm, 1/125, f/4, ISO-125, remote speedlight in a soft-box. Adjustments made in Lightroom, converted to grey-scale in Photoshop.
Have I met the assignment criteria?
- Consider how to use the image and text together to create my chosen narrative.
Yes, I believe I achieved this.
- Look at how images can be used to tell us about things we can’t see, to convey a feeling or suggestion.
Yes, I believe that my images meet this aim.
- Try to keep to things that I have a personal interest in or curious about.
Yes, I believe that I have kept within this field.
- Produce 7 – 10 tightly edited and visually consistent.
Yes, x 7 key images consistent with the narrative.
- Write a 300 word Introduction.
Yes, A 300 word complementing narrative.
Based upon the feedback from my fellow students from my forum, particularly the very helpful and I thought good advice from Steve Middlehurst, who suggested adding the stills as well as the slideshow for the assessors to be able to clearly scrutinize each image. With this in mind I decided to put the slideshow at the very top just beneath the title and as each image represents the unseen I feel it works well and added the large stills beneath the text for closer examination.
I sent away for my images to be printed by a third-party printing company, when they came back I found that the crop they had used was not the same as I had expected and seen on my screen then ordering through their online website. I had waited a week for the photos to arrive and decided that it was too risky to try and get a better print from this same company; so I visited my local Tesco that has a photo-lab but they could not offer a service that included a border forcing me to try and coble one up in Photoshop. Moreover, they could not offer a matching matt-paper, silk being their nearest option. I emailed my Tutor who insisted that my presentation should be consistent. At first I was annoyed and turned to my student forum for advice. They were all great, I got a little from some reminding me that I should be printing my own work anyway if I want to be a professional photographer which I needed to hear even if I didn’t at first like it. A fellow student suggested a Canon printer that he uses and I ordered one on Amazon Canon PI7250 for £50, plus paper and spare inks. Thursday, mid-morning I took delivery of my new printer and after unpacking and setting up spent the rest of the day figuring out the mysteries of printer profiles and colour profiles. Fortunately, I have been in the practice of calibrating my screen using a Colour Spyder4 and by late Thursday evening I printing out my assignment photos for my Tutor. I can truly say this assignment has taught me lots.